分类 VPS相关 下的文章

 title=
KMS,是 Key Management System 的缩写,也就是密钥管理系统。这里所说的 KMS,毋庸置疑就是用来激活 VOL 版本的 Windows 和 Office 的 KMS 啦。经常能在网上看到有人提供的 KMS 服务器地址,那么你有没有想过自己也来搞一个这样的服务呢?而这样的服务在 Github 上已经有开源代码实现了。
本文就是在这个开源代码的基础上,开发了适用于三大 Linux 发行版的一键安装 KMS 服务的脚本。

本脚本适用环境

系统支持:CentOS 6+,Debian 7+,Ubuntu 12+
虚拟技术:任意
内存要求:≥128M
日期  :2018 年 10 月 25 日

关于本脚本

1、本脚本适用于三大 Linux 发行版,其他版本则不支持。
2、KMS 服务安装完成后会加入开机自启动。
3、默认记录日志,其日志位于 /var/log/vlmcsd.log。

使用方法

使用root用户登录,运行以下命令:

wget --no-check-certificate https://github.com/teddysun/across/raw/master/kms.sh && chmod +x kms.sh && ./kms.sh

安装完成后,输入以下命令查看端口号 1688 的监听情况

netstat -nxtlp | grep 1688

返回值类似于如下这样就表示 OK 了:

tcp        0      0 0.0.0.0:1688                0.0.0.0:*                   LISTEN      3200/vlmcsd         
tcp        0      0 :::1688                     :::*                        LISTEN      3200/vlmcsd 

本脚本安装完成后,会将 KMS 服务加入开机自启动。

使用命令:
启动:/etc/init.d/kms start
停止:/etc/init.d/kms stop
重启:/etc/init.d/kms restart
状态:/etc/init.d/kms status

卸载方法:

使用 root 用户登录,运行以下命令:

./kms.sh uninstall

如何使用 KMS 服务
KMS 服务,用于在线激活 VOL 版本的 Windows 和 Office。
激活的前提是你的系统是批量授权版本,即 VL 版,一般企业版都是 VL 版。而 VL 版本的镜像一般内置 GVLK key,用于 KMS 激活。
下面列表里面含有的产品的 VL 版本或者能使用 key 进入 KMS 通道的产品,都支持使用 KMS 激活。

Office 2019 & Office 2016:https://docs.microsoft.com/en-us/DeployOffice/vlactivation/gvlks
Office 2013:https://technet.microsoft.com/zh-cn/library/dn385360.aspx
Office 2010:https://technet.microsoft.com/zh-cn/library/ee624355(v=office.14).aspx
Windows:https://docs.microsoft.com/zh-cn/windows-server/get-started/kmsclientkeys

使用管理员权限运行 cmd 查看系统版本,命令如下:

wmic os get caption

使用管理员权限运行 cmd 安装从上面列表得到的 key,命令如下:

slmgr /ipk xxxxx-xxxxx-xxxxx-xxxxx-xxxxx

使用管理员权限运行 cmd 将 KMS 服务器地址设置为你自己的 IP 或 域名,后面最好再加上端口号(:1688),命令如下:

slmgr /skms Your IP or Domain:1688

注意:本脚本所做的工作就是此步骤。当你的 KMS 服务出于启动状态,那么此处就可以设置为你自己的 KMS 服务器地址。
使用管理员权限运行 cmd 手动激活系统,命令如下:

slmgr /ato

关于 Office 的激活,要求必须是 VOL 版本,否则无法激活。
找到你的 Office 安装目录,32 位默认一般为 C:\Program Files (x86)\Microsoft Office\Office16
64 位默认一般为 C:\Program Files\Microsoft Office\Office16
Office16 是 Office 2016,Office15 就是 Office 2013,Office14 就是 Office 2010。
打开以上所说的目录,应该有个 OSPP.VBS 文件。
使用管理员权限运行 cmd 进入 Office 目录,命令如下:

cd "C:\Program Files (x86)\Microsoft Office\Office16"

使用管理员权限运行 cmd 注册 KMS 服务器地址:

cscript ospp.vbs /sethst:Your IP or Domain

使用管理员权限运行 cmd 手动激活 Office,命令如下:

cscript ospp.vbs /act

注意: KMS 方式激活,其有效期只有 180 天。
每隔一段时间系统会自动向 KMS 服务器请求续期,请确保你自己的 KMS 服务正常运行。

常见错误的对策
如果遇到在执行过程报错,请按以下步骤检查:
1,你的 KMS 服务器是否挂了?
2,你的 KMS 服务是否正常开启?
3,你的系统或 Office 是否为批量 VL 版本?
4,你的系统或 Office 是否修改过 Key 或未安装 GVLK Key?
5,你是否以管理员权限运行 cmd?
6,你的网络连接是否正常?
7,你的本地 DNS 解析是否正常?
8,如果你排除了以上的对策,那请根据错误提示代码自行搜索原因。

更新日志

2018 年 10 月 25 日:修正 vlmcsd 的 git 链接,即每次全新安装皆为官方的最新版本。注意:如果你想升级版本,则需要先停止 kms 服务,再删除 /usr/bin/vlmcsd 文件,然后重新下载最新脚本安装即可。

参考链接
https://03k.org/kms.html

本文转自:https://teddysun.com/530.html,版权归原作者所有。
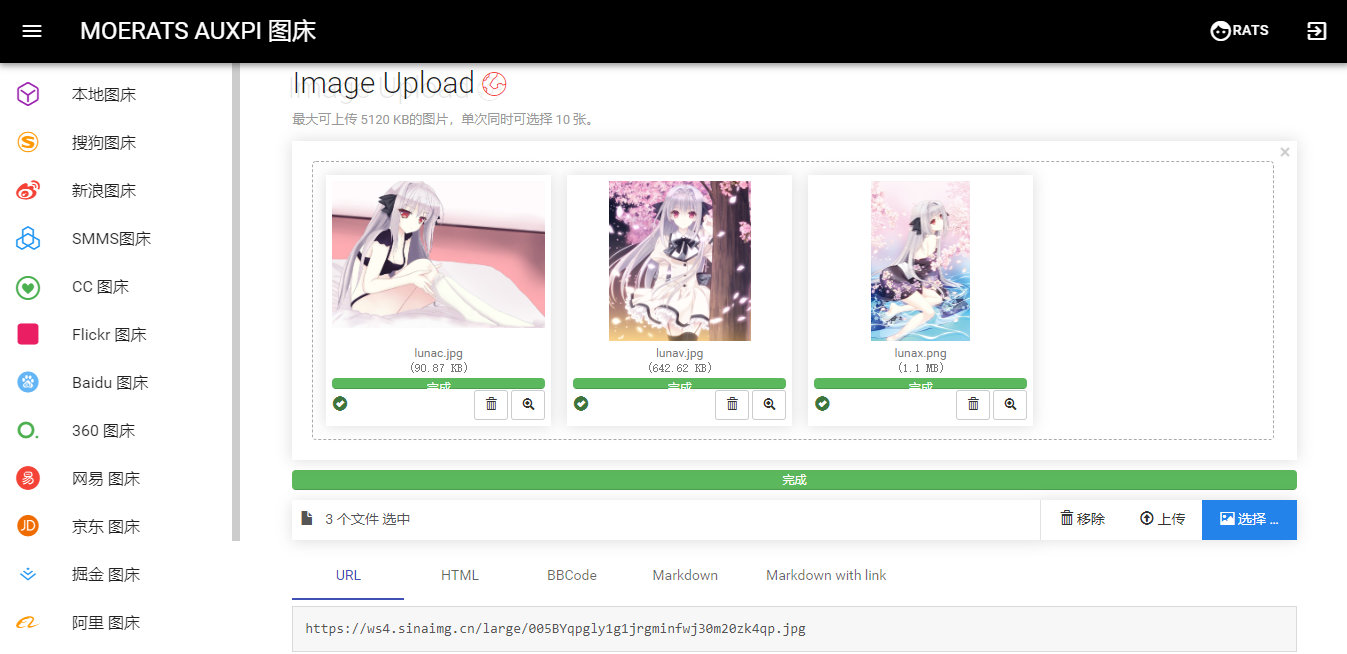
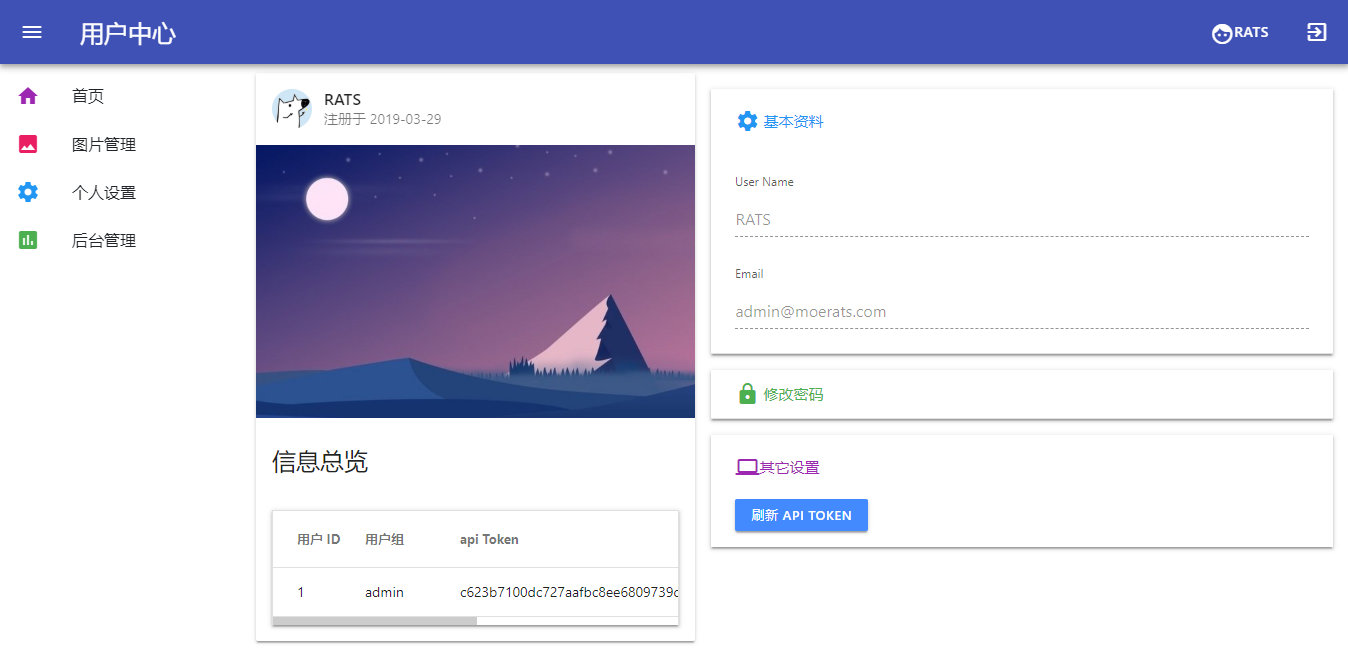
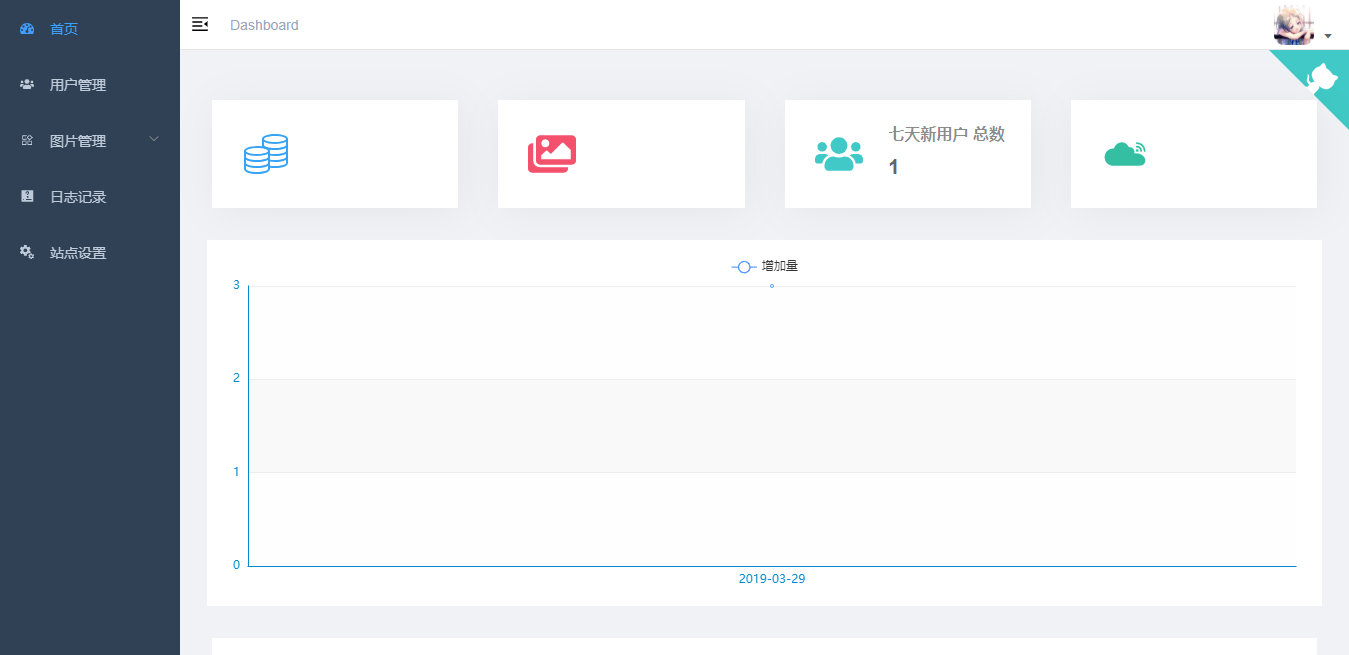
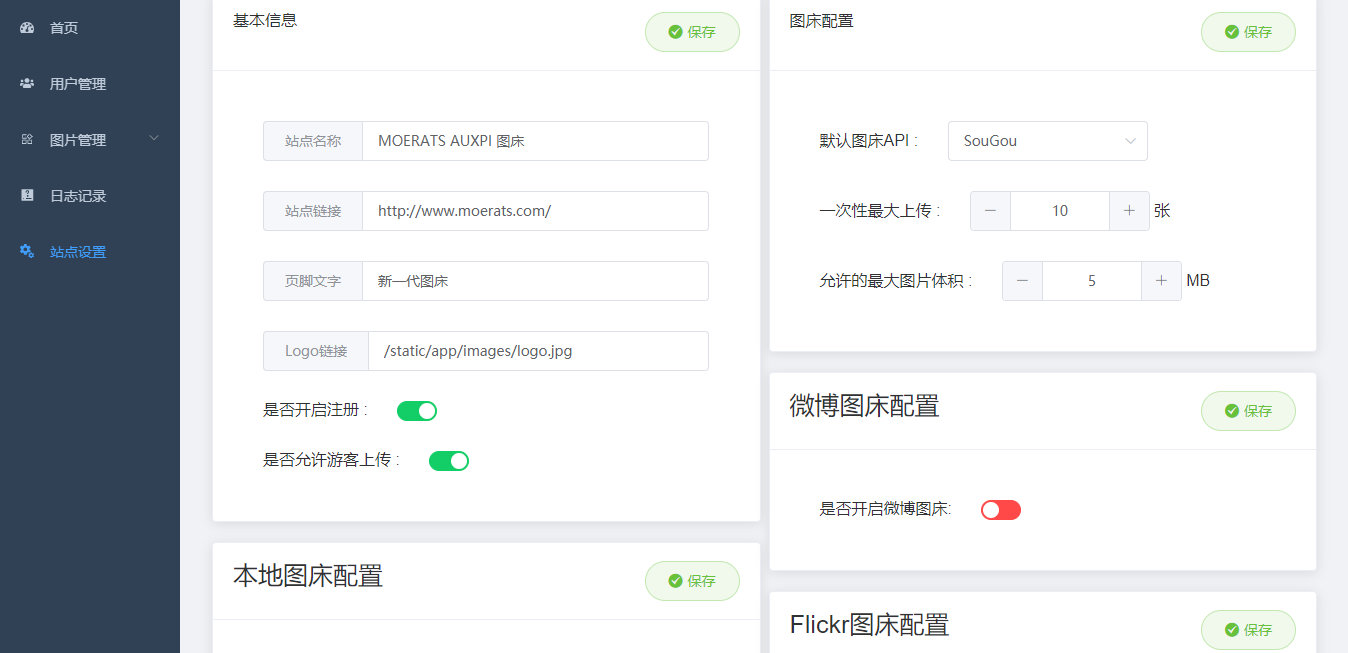
说明:对于图床程序的话,博主之前介绍过好几种,查看:Chevereto、ImgURL。貌似最火的还是国外的Chevereto,这里再分享个图床程序AUXPI,和ImgURL比较类似,都支持API上传,SMMS图床上传。不过该图床还处于发育初期阶段,貌似以后会越来越强,可以期待下。

截图

 title=

 title=

 title=

 title=

更新

【2019.3.29】
该程序变动较大,支持更多图床,新增后台,用户注册等功能,安装环境多了个Mysql,更新安装方法

功能

支持web上传图片    
支持API上传图片    
支持图床:
搜狗
新浪(私有+公共)
SMMS
奇虎(360)
百度
阿里
京东
Upload.cc
Flickr
网易
掘金
本地

安装

Github地址:https://github.com/aimerforreimu/AUXPI

所需环境:Mysql、Nginx/Caddy(非必需,但如果你要使用域名访问就需要安装了)。

1、安装Web环境
#CentOS系统
wget -O install.sh http://download.bt.cn/install/install_6.0.sh && sh install.sh
#Ubuntu系统
wget -O install.sh http://download.bt.cn/install/install-ubuntu_6.0.sh && sudo bash install.sh
#Debian系统
wget -O install.sh http://download.bt.cn/install/install-ubuntu_6.0.sh && bash install.sh

安装完成后,进入面板,点击左侧软件管理,然后安装Mysql、Nginx(如果你使用域名的话,就需要安装)。

然后点击左侧数据库-添加数据库,设置好数据库信息。

2、安装AUXPI

首先进入到Release→传送门,下载最新版的Linux系统AUXPI文件,目前为V2.0.1。

#新建文件夹用来存放auxpi文件
mkdir auxpi && cd auxpi
wget https://github.com/aimerforreimu/auxpi/releases/download/2.0.1/auxpi-2.0.1-linux.tar.gz
#解压并移动文件
tar zxvf auxpi*.tar.gz && rm -rf auxpi*.tar.gz
mv build/linux/* ./
rm -rf build
#初始化
chmod -u+x auxpi
./auxpi init
#编辑配置文件
nano auxpi/app.conf

大致参数如下:

#一般只建议修改下面2个参数,程序默认运行端口和运行模式,端口可以默认2333,运行模式必须修改为pro
httpport = 2333
runmode = pro

再编辑站点配置文件:

nano conf/siteConfig.json

大致如下:

{
  "site_name": "AuXpI API 图床",  #站点名称    
  "site_footer": "",  #footer输出的内容
  "site_url": "http://yoursite.com/",  #站点url
  "logo":"/static/app/images/logo.jpg",  #站点logo
  "site_upload_max_number": 10,  #一次性最多可以上传多少张图片
  "site_up_load_max_size": 5,  #最大允许上传的图片大小,单位MB
  "allow_tourists":false,  #访客上传,false为关闭,ture为开启
  "allow_register":false,  #用户注册,false为关闭,ture为开启
  "db_option": {
      "use_db": true,     
      "db_type": "mysql",       
      "db_host": "127.0.0.1:3306",  #数据库地址,正常不需要修改
      "db_name": "auxpi",  #数据库名称
      "db_user": "root",  #数据库用户名
      "db_pass": "moerats",  #数据库密码
      "table_prefix": "auxpi_"  #数据表前缀,可不修改
    },

其实这里你只需要配置好数据库信息就行了,其他设置都可以在后台面板设置。

然后开始创建数据表:

./auxpi migrate

创建管理员账户:

#以下命令会给你创建一个用户名RATS,邮箱admin@moerats.com,密码moerats的管理员账户,请自行修改
./auxpi -mod=admin -name=RATS -email=admin@moerats.com -pass=moerats 

开始运行程序:

#CentOS系统
yum install screen -y
#Debian/Ubuntu系统
apt install screen -y

#后台运行
screen -dmS auxpi ./auxpi run

运行成功后使用IP:2333进行访问,如果站点打不开,可能需要开启防火墙,点击面板左侧-安全,放行2333端口即可。

3、域名反代

点击左侧网站-添加站点,然后再点击添加好了的域名名称,这时候就进入了站点配置,点击反向代理-添加反向代理,目标URL填入http://127.0.0.1:2333,再提交即可。如果要启用https访问的,点击SSL,申请Let's Encrypt,强制https访问即可。

本文转自:https://www.moerats.com/archives/789/
版权归原作者所有,转载请注明出处!

 title=

安装

教程在CentOS7下操作,其它系统需要稍作修改。

安装EPEL源:

yum -y install epel-release

安装一些基本组件和依赖:

yum -y install wget unzip screen fuse fuse-devel

下载Rclone-解压-重命名文件夹-进入文件夹

wget https://downloads.rclone.org/rclone-current-linux-amd64.zip
unzip rclone-current-linux-amd64.zip
mv rclone-vxxx-linux-amd64 rclone #目前是v1.45,此处根据具体解压出来的版本号修改,可用ll命令查看目录名
cd rclone

配置

运行Rclone开始配置:

./rclone config

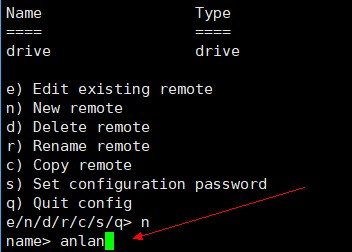
第一步选择n(新建),然后回车输入一个name(名字),如图所示:

 title=

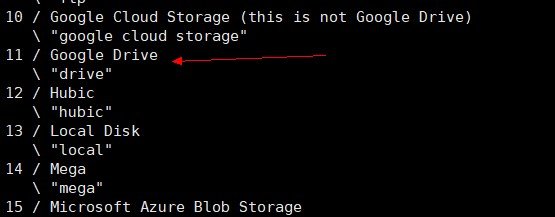
然后选择我们要挂载的类型,不同的版本这里的序号可能不同,请自行修改,这里我们选择11:

 title=

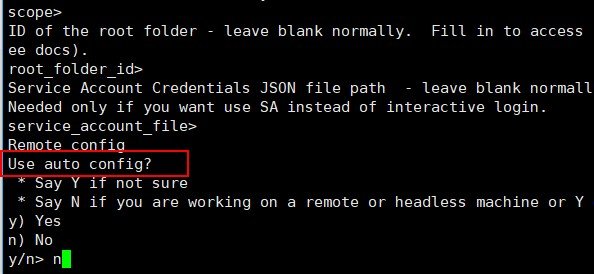
在看到Use auto config?之前一直回车就行
在看到Use auto config?后选择n

 title=

之后会返回一个GoogleDrive授权地址,把它复制到浏览器打开
按提示登陆,复制获取到的代码,然后返回终端粘贴后回车

 title=

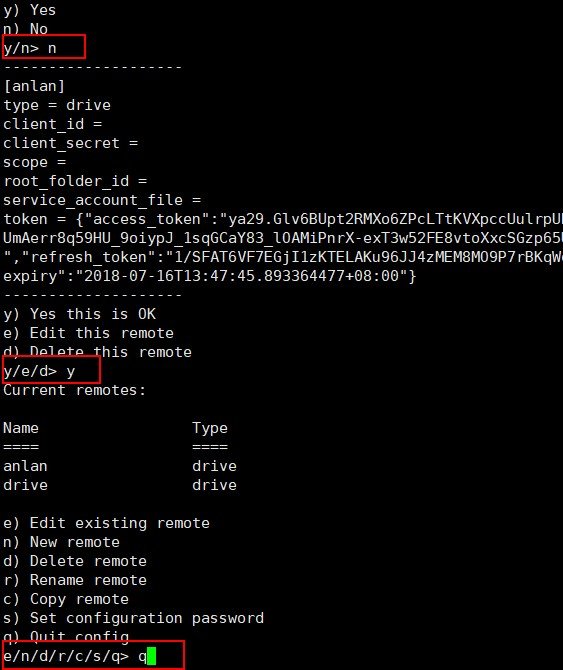
最后分别输入n,y,q回车退出配置

 title=

挂载

全部完成后,现在新建一个你要挂载的目录,例如我要挂载到/home/drive

mkdir -p /home/drive

用screen创建一个新的会话:

screen -S rclone

执行如下命令:

./rclone mount anlan: /home/drive --allow-other --allow-non-empty --vfs-cache-mode writes

挂载其实只要几秒钟,但终端不会返回成功信息,直接重连。
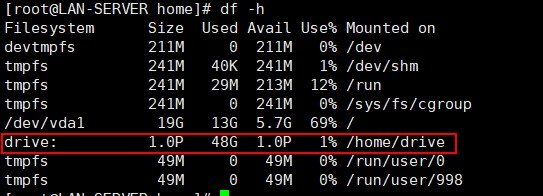
重连后查看是否成功

df -h

开机自启

先把rclone的可执行文件复制到/usr/bin:

cp /root/rclone/rclone /usr/bin/rclone

新建一个rclone.service文件:
确定你会使用vi编辑器,否则请使用WinSCP,Xftp之类软件来新建

vi /usr/lib/systemd/system/rclone.service

写入:

[Unit]
Description=rclone

[Service]
User=root
ExecStart=/usr/bin/rclone mount anlan: /home/drive --allow-other --allow-non-empty --vfs-cache-mode writes
Restart=on-abort

[Install]
WantedBy=multi-user.target

anlna=你创建第一步中的name,/home/drive=你设置挂载的路径,修改成自己的

重载daemon,让新的服务文件生效:

systemctl daemon-reload

现在就可以用systemctl来启动rclone了:

systemctl start rclone

设置开机启动:

systemctl enable rclone

停止、查看状态可以用:

systemctl stop rclone
systemctl status rclone

重启你的VPS:

reboot

重启后查看一下rclone的服务起来没,接着查看一下盘子挂上去没:

systemctl status rclone
df -h

挂载成功:

 title=

本文转自:https://anlan.ga/19,版权归作者所有。

前期准备

\#客户端授权

在本地Windows电脑上下载rclone,下载地址:https://rclone.org/downloads/ 。然后解压出来,进入cmd,输入以下命令:

rclone authorize "onedrive"

之后会弹出窗口认证,然后复制token

Paste the following into your remote machine --->
{"access_token":"xxxx"}  #请复制{xx}整个内容(包括花括号),后面需要用到
<---End paste

\#安装fuse

在服务器上安装fuse,在挂载时会用到

yum install fuse

安装rclone

\#安装

curl https://rclone.org/install.sh | sudo bash

\#初始化配置

rclone config
No remotes found - make a new one
n) New remote
s) Set configuration password
q) Quit config
n/s/q> n
name> Spirit #随便填
Type of storage to configure.
Enter a string value. Press Enter for the default ("").
Choose a number from below, or type in your own value
 1 / A stackable unification remote, which can appear to merge the contents of several remotes
   \ "union"
 2 / Alias for a existing remote
   \ "alias"
 3 / Amazon Drive
   \ "amazon cloud drive"
 4 / Amazon S3 Compliant Storage Provider (AWS, Alibaba, Ceph, Digital Ocean, Dreamhost, IBM COS, Minio, etc)
   \ "s3"
 5 / Backblaze B2
   \ "b2"
 6 / Box
   \ "box"
 7 / Cache a remote
   \ "cache"
 8 / Dropbox
   \ "dropbox"
 9 / Encrypt/Decrypt a remote
   \ "crypt"
10 / FTP Connection
   \ "ftp"
11 / Google Cloud Storage (this is not Google Drive)
   \ "google cloud storage"
12 / Google Drive
   \ "drive"
13 / Hubic
   \ "hubic"
14 / JottaCloud
   \ "jottacloud"
15 / Local Disk
   \ "local"
16 / Mega
   \ "mega"
17 / Microsoft Azure Blob Storage
   \ "azureblob"
18 / Microsoft OneDrive
   \ "onedrive"
19 / OpenDrive
   \ "opendrive"
20 / Openstack Swift (Rackspace Cloud Files, Memset Memstore, OVH)
   \ "swift"
21 / Pcloud
   \ "pcloud"
22 / QingCloud Object Storage
   \ "qingstor"
23 / SSH/SFTP Connection
   \ "sftp"
24 / Webdav
   \ "webdav"
25 / Yandex Disk
   \ "yandex"
26 / http Connection
   \ "http"
Storage> 18 #选择18,Microsoft OneDrive
** See help for onedrive backend at: https://rclone.org/onedrive/ **
 
Microsoft App Client Id
Leave blank normally.
Enter a string value. Press Enter for the default ("").
client_id> #留空
Microsoft App Client Secret
Leave blank normally.
Enter a string value. Press Enter for the default ("").
client_secret> #留空
Edit advanced config? (y/n)
y) Yes
n) No
y/n> n
Remote config
Use auto config?
 * Say Y if not sure
 * Say N if you are working on a remote or headless machine
y) Yes
n) No
y/n> n  #选择n
For this to work, you will need rclone available on a machine that has a web browser available.
Execute the following on your machine:
    rclone authorize "onedrive"
Then paste the result below:
result> {"access_token":""}  #输入之前在客户端授权的内容
--------------------
Choose a number from below, or type in an existing value
 1 / OneDrive Personal or Business
   \ "onedrive"
 2 / Root Sharepoint site
   \ "sharepoint"
 3 / Type in driveID
   \ "driveid"
 4 / Type in SiteID
   \ "siteid"
 5 / Search a Sharepoint site
   \ "search"
Your choice> 1 #选择1
--------------------
y) Yes this is OK
e) Edit this remote
d) Delete this remote
y/e/d> y  #选择y
Current remotes:
 
Name                 Type
====                 ====
Spirit                 onedrive
 
e) Edit existing remote
n) New remote
d) Delete remote
r) Rename remote
c) Copy remote
s) Set configuration password
q) Quit config
e/n/d/r/c/s/q> q  #选择q退出

\#挂载

rclone mount Spirit:Wallpapers /mnt/3/ --copy-links --no-gzip-encoding --no-check-certificate --allow-other --allow-non-empty --umask 000

Spirit为初始化配置填的name,Wallpapers为OneDrive里的文件夹,/mnt/3/为VPS上的本地文件夹

\#卸载

fusermount -qzu /mnt/3/

设置开机自启

下载脚本

wget -N --no-check-certificate https://raw.githubusercontent.com/x91270/Centos/master/rcloned

\#修改一下内容

vim rcloned
NAME=""  #rclone name名,及配置时输入的Name
REMOTE=''  #远程文件夹,OneDrive 网盘里的挂载的一个文件夹
LOCAL=''  #挂载地址,VPS本地挂载目录

\#设置自启

mv rcloned /etc/init.d/rcloned
chmod +x /etc/init.d/rcloned
chkconfig rcloned on
bash /etc/init.d/rcloned start

原文出处:https://spiritx.xyz/503.html,版权归原作者所有。

简介

When we need to reinstall the VPS/cloud platform/Dedicated Servers operating system, it can usually be reinstalled through the service provider template and ISO mount.
Starting today, you will have a completely new way to install a clean operating system with one click of the network, without CD-ROM, without VNC/IPIM/KVM.
Both Linux and Windows can be installed in one click on the network, opening up a wonderful experience with a simple two-line command.
One-click Network Reinstall System – Magic Modify version, Forked from MoeClub Vicer, technical support and maintenance provided by Technical Blog | 技術博客, more features of the magic version are constantly increasing.
If you are from an English community, please click here.

当我们需要重装VPS/云平台/独立服务器操作系统时,通常可以通过服务商模板和ISO挂载的方式重新安装。

从今天开始,你将拥有了一个全新的方式,通过网络一键式重新安装纯净操作系统,无需CD-ROM,无需VNC/IPIM/KVM。

无论是Linux,还是Windows,都可以通过网络一键式完成安装,通过简单的两行命令开启美妙的体验。

一键网络重装系统 – 魔改版,从萌咖Vicer萌咖Vicer进行分支,由Technical Blog | 技術博客提供技术支持和维护,魔改版更多功能不断增加中。

现实需求

为什么我们需要重装纯净系统?

  1. 服务商提供的系统模板可能会内置一些软件,甚至和我们即将安装的软件产生冲突,导致安装失败。
  2. ISO挂载并不是所有服务商都提供的服务,一些IPIM/KVM传输速度过于缓慢,安装效率较差。
  3. Linux/Windows在使用中可能遇到一些找不到问题的莫名错误。相信你一定深有体会!
你需要了解
  1. 所有系统安装完毕的默认密码是[cxthhhhh.com],为了防止暴力破解,你必须在安装完毕立刻修改默认密码!
  2. 因硬件配置和网络环境不同,安装全程需要15-60分钟,请耐心等待。安装完成即可通过IP:22(Linux SSH)/IP:3389(Windows RDP)进行连接。
  3. 为了稳定性和安全性,我建议所有网站管理员/开发者/公司使用最新的系统,同时我只为最新的系统提供技术支持。
  4. 所有镜像托管于Open Disk CDN,你应该访问以下文章了解镜像,使用时应校对MD5和SHA1是否正确。

[[原创] Windows系统DD磁盘(VHD)映像(添加驱动程序Virtio,Xen,Hyper)(独立服务器+全虚拟化支持)](https://tech.cxthhhhh.com/windows/2018/11/02/original-windows-system-dd-disk-vhd-image-for-your-server-and-computer-add-drivers-virtio-xen-hyper-cn.html "[原创] Windows系统DD磁盘(VHD)映像(添加驱动程序Virtio,Xen,Hyper)(独立服务器+全虚拟化支持)")

  1. 一些没有DHCP的VPS/云平台/独立服务器,安装后无法访问网络,你需要登陆VNC/IPIM/KVM后手动进行网卡IP配置。
  2. 源码安全,并托管在Github:

    https://github.com/MeowLove/Network-Reinstall-System-Modify

    重装系统前环境需求

  3. 当前已安装任意由GRUB or GRUB2引导Linux系统(RedHat/CentOS/Debian/Ubuntu/Etc.)
  4. 安装重装系统的前提组件

①. RedHat/CentOS:

yum install -y xz openssl gawk file

②. Debian/Ubuntu:

apt-get install -y xz-utils openssl gawk file

让我们开始吧

  1. 下载SHELL脚本(通过root用户运行)

    wget --no-check-certificate -qO ~/Network-Reinstall-System-Modify.sh 'https://tech.cxthhhhh.com/tech-tools/Network-Reinstall-System-Modify/Network-Reinstall-System-Modify.sh' && chmod a+x ~/Network-Reinstall-System-Modify.sh
  2. 安装系统(任选其一)
    【安装Linux系统】

①. 一键网络重装纯净CentOS 7(推荐)

bash ~/Network-Reinstall-System-Modify.sh -CentOS_7

②. 一键网络重装纯净CentOS 6

bash ~/Network-Reinstall-System-Modify.sh -CentOS_6

③. 一键网络重装纯净Debian 9(推荐)

bash ~/Network-Reinstall-System-Modify.sh -Debian_9

④. 一键网络重装纯净Debian 8

bash ~/Network-Reinstall-System-Modify.sh -Debian_8

⑤. 一键网络重装纯净Debian 7

bash ~/Network-Reinstall-System-Modify.sh -Debian_7

⑥. 一键网络重装纯净Ubuntu 18.04(推荐)

bash ~/Network-Reinstall-System-Modify.sh -Ubuntu_18.04

⑦. 一键网络重装纯净Ubuntu 16.04

bash ~/Network-Reinstall-System-Modify.sh -Ubuntu_16.04

⑧. 一键网络重装纯净Ubuntu 14.04

bash ~/Network-Reinstall-System-Modify.sh -Ubuntu_14.04

【安装Windows系统】

*警告:你需要购买来自Microsoft或其合作伙伴正版系统授权并激活系统使用。继续安装即代表您知悉并已经购买正版授权。

①. 一键网络重装纯净Windows Server 2019(推荐)

bash ~/Network-Reinstall-System-Modify.sh -Windows_Server_2019

②. 一键网络重装纯净Windows Server 2016

bash ~/Network-Reinstall-System-Modify.sh -Windows_Server_2016

③. 一键网络重装纯净Windows Server 2012 R2

bash ~/Network-Reinstall-System-Modify.sh -Windows_Server_2012R2

④. 一键网络重装纯净Windows Server 2008 R2

bash ~/Network-Reinstall-System-Modify.sh -Windows_Server_2008R2

⑤. 一键网络重装纯净Windows 7 Vienna

bash ~/Network-Reinstall-System-Modify.sh -Windows_7_Vienna

⑥. 一键网络重装纯净Windows Server 2003

bash ~/Network-Reinstall-System-Modify.sh -Windows_Server_2003

【安装裸机系统部署平台】

*仅适用于高端用户,手动安装任意系统。可通过网络ISO或iPXE安装任意系统。(使用教程即将发布)

bash ~/Network-Reinstall-System-Modify.sh -CXT_Bare-metal_System_Deployment_Platform

[[原创] 裸机系统部署平台:VNC自定义安装任何系统(适用于Linux / Windows)[一键网络重装系统 – 魔改版]](https://tech.cxthhhhh.com/linux/2019/01/07/original-bare-metal-system-deployment-platform-vnc-custom-install-any-system-for-linux-windows-one-click-network-reinstall-system-magic-modify-version-cn.html "[原创] 裸机系统部署平台:VNC自定义安装任何系统(适用于Linux / Windows)[一键网络重装系统 – 魔改版]")

【安装DD系统】

*如果您不了解这意味着什么,请不要进行操作。%ULR%应该替换为您自己的映像地址。

bash ~/Network-Reinstall-System-Modify.sh -DD "%URL%"

恭喜,你已经完成了系统重装,享受当下的美好
当您执行完上面的2行命令,你的服务器将开始网络重装纯净系统。在完成安装前,您将无法进行连接管理。

因硬件配置和网络环境不同,安装全程需要15-60分钟,请耐心等待。安装完成即可通过IP:22(Linux SSH)/IP:3389(Windows RDP)进行连接。

[Technical Blog | 技術博客] 的联络方式:Telegram 频道:[My Share] [Telegram 组群:[Technical Blog|技術博客]](https://t.me/Technical_Blog "Technical Blog")

这篇文章发表在[CXT] Technical Blog | 技術博客,如果您需要转发分享,请注明出处。